Most back pain sufferers abandon inversion therapy within six weeks, not because it fails, but because they misunderstand the progression curve. The Inversion Table Results Timeline: What to Expect in Week 1, Month 1, and Month 3 reveals a pattern that resembles learning to swim—initial discomfort gives way to gradual adaptation, followed by a plateau that tests your commitment. Understanding this timeline transforms your approach from hopeful experimentation into strategic rehabilitation.
Key Takeaways
- Week 1 focuses on body adaptation with 60-90 second sessions at shallow angles (15-30 degrees) to build tolerance
- Month 1 delivers noticeable pain reduction and improved flexibility as you progress to 3-5 minute sessions at steeper angles
- Month 3 marks the common plateau phase where maintaining consistency becomes more important than increasing intensity
- Realistic expectations prevent premature abandonment of therapy during the adaptation and plateau periods
- Proper progression protocols maximize benefits while minimizing risks associated with inversion therapy
Understanding the Inversion Table Results Timeline: What to Expect in Week 1, Month 1, and Month 3
Your body responds to inversion therapy in predictable phases. The first week establishes neural pathways and tissue adaptation. Month one builds therapeutic momentum. Month three tests your resolve as dramatic improvements level off. This timeline applies whether you suffer from herniated discs, sciatica, or chronic lower back pain.
The progression differs significantly from pharmaceutical interventions. Pills mask symptoms immediately but offer no structural improvement. Inversion therapy works gradually, decompressing vertebrae and improving circulation over weeks rather than hours. Benefits of inversion therapy accumulate through consistent application, not sporadic use.
Week 1: The Adaptation Phase
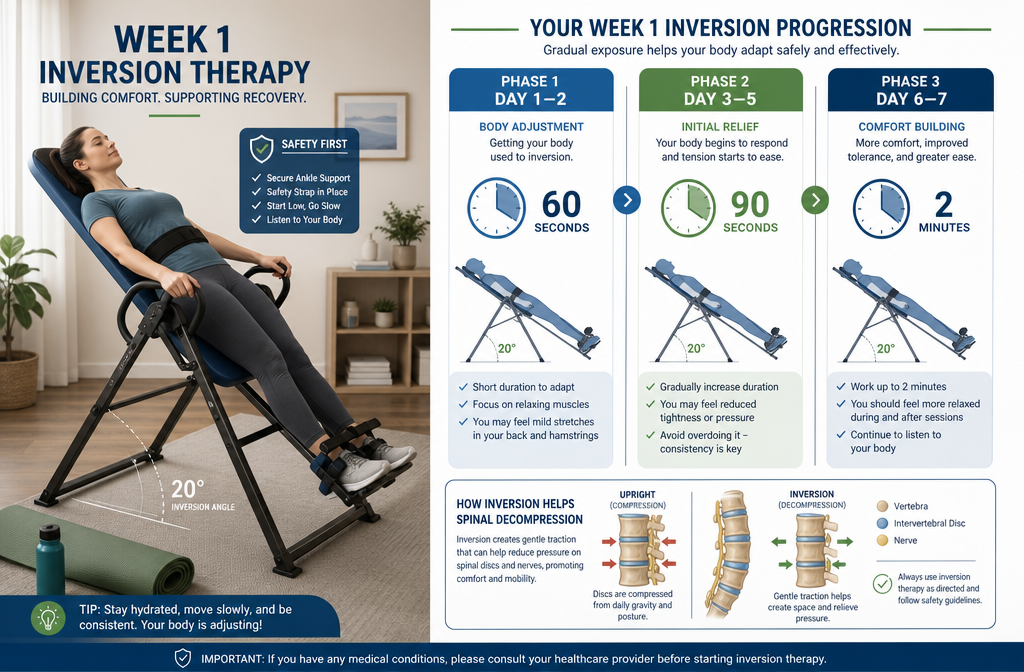
Your first week centers on acclimation, not aggressive treatment. Start with 60-second sessions at 15-20 degrees, twice daily. Your body needs time to adjust to the inverted position. Blood pressure changes, inner ear balance recalibrates, and ankle joints adapt to supporting your weight differently.
Most users experience mild lightheadedness during initial sessions. This response normalizes within three to four days. Your vestibular system requires time to process the new orientation. How to use an inversion table safely provides essential protocols for this critical phase.
Week 1 Daily Protocol:
- Days 1-2: 60 seconds at 15-20 degrees, once daily
- Days 3-5: 90 seconds at 20-25 degrees, twice daily
- Days 6-7: 2 minutes at 25-30 degrees, twice daily
Physical sensations vary widely. Some users report immediate relief from compressed nerves. Others feel increased awareness of tight muscles and restricted fascia. Both responses indicate your body recognizes the therapeutic stimulus. Avoid the temptation to extend sessions beyond recommended durations. Tissue adaptation requires gradual progression, not aggressive forcing.
Month 1: Building Therapeutic Momentum
The first month delivers the most noticeable improvements. Spinal decompression accumulates with each session. Disc spacing increases measurably. Nerve root pressure decreases. Most users report 30-40% pain reduction by week four.
Your sessions now extend to 3-5 minutes at 30-45 degrees. This angle provides optimal decompression without excessive cardiovascular stress. The gravitational pull creates 40-60% of your body weight in traction force—sufficient for therapeutic benefit without tissue damage.
Month 1 Progression Markers:
- Reduced morning stiffness and improved spinal mobility
- Decreased reliance on pain medication or anti-inflammatory drugs
- Better sleep quality due to reduced nighttime discomfort
- Increased confidence in movement and daily activities
Consistency determines outcomes during this phase. Daily sessions produce superior results compared to sporadic use. Your intervertebral discs require regular decompression to maintain hydration and nutrient flow. Inversion table results depend heavily on adherence to scheduled sessions.
Some users experience temporary soreness as dormant muscles activate. This response differs from injury pain—it signals tissue remodeling and strengthening. Inversion tables for chronic pain addresses this adaptation process comprehensively.
Month 3: The Plateau Effect and Maintenance Strategies
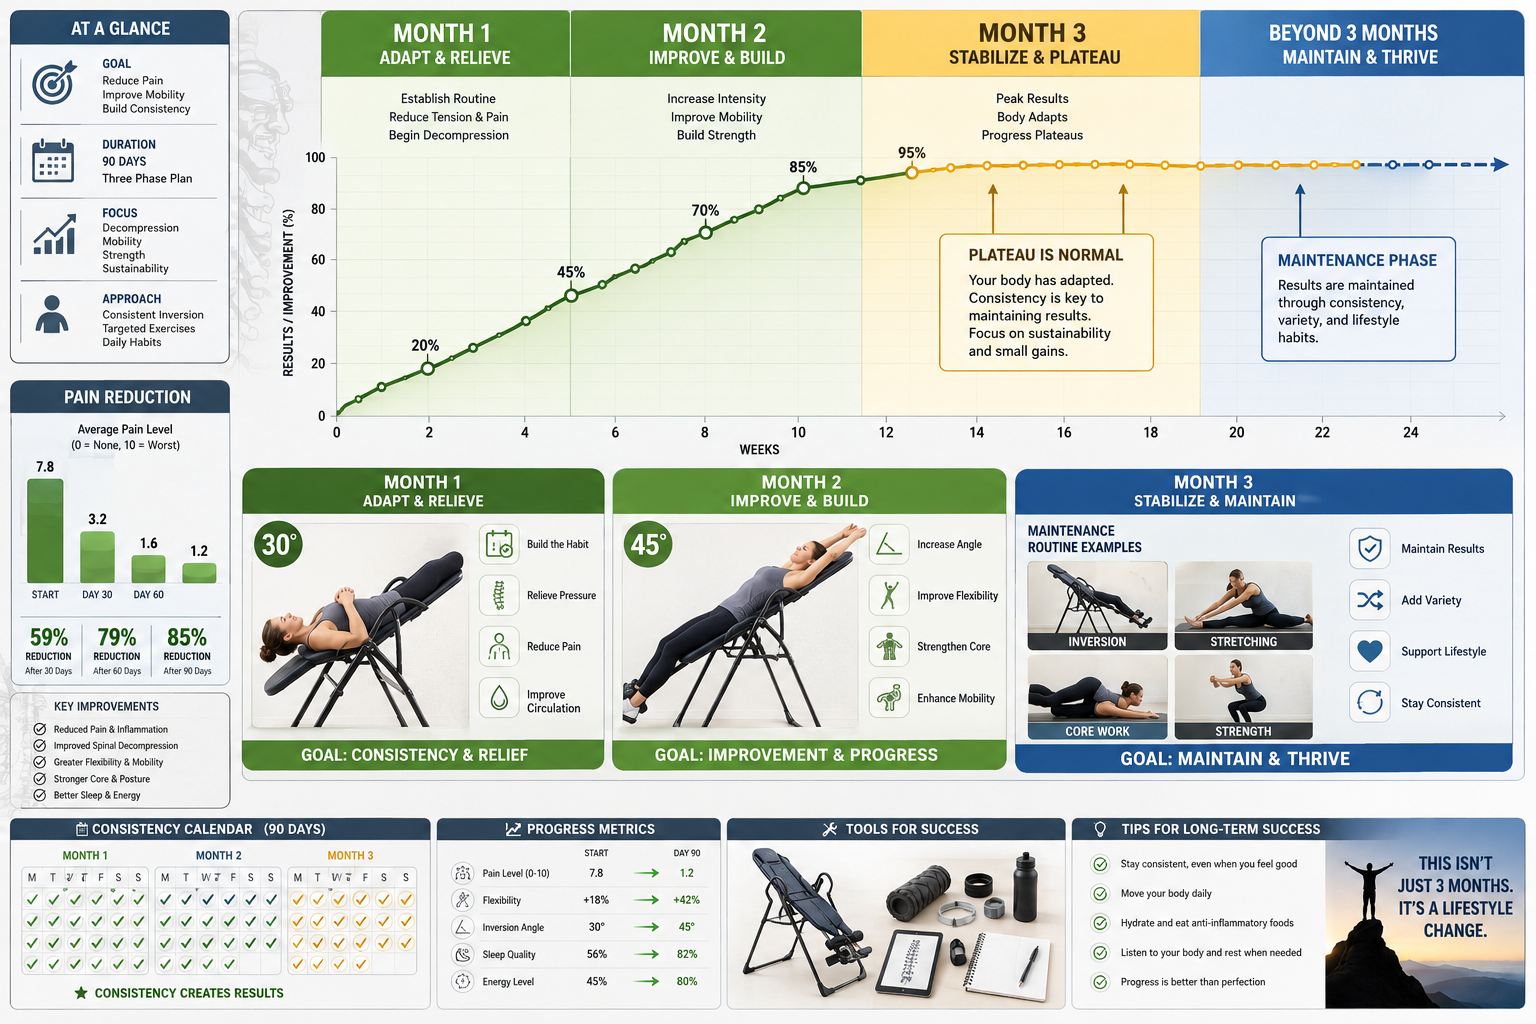
Month three introduces the plateau that discourages many users. Pain reduction slows. Flexibility gains level off. The dramatic improvements from months one and two give way to maintenance mode. This plateau represents success, not failure—your body has achieved a new baseline.
The Inversion Table Results Timeline: What to Expect in Week 1, Month 1, and Month 3 shows this leveling effect consistently across user populations. Your spine has decompressed to its optimal spacing given current tissue flexibility and muscle strength. Further improvements require complementary interventions, not longer inversion sessions.
Strategies to Overcome the Month 3 Plateau:
- Vary your angles: Alternate between 30, 45, and 60 degrees to stimulate different spinal segments
- Add rotational movements: Gentle twists while inverted target facet joints and improve mobility
- Integrate core strengthening: Perform inverted crunches or leg raises to support spinal stability
- Combine with nutrition: Food choices that boost inversion table results enhance tissue repair and inflammation control
- Schedule strategic rest days: Two sessions daily becomes five sessions weekly to prevent adaptation fatigue
The plateau phase tests your commitment to long-term spinal health. Users who maintain consistent sessions through months 3-6 report sustained benefits and prevention of symptom recurrence. Those who abandon therapy often experience gradual return of compression-related pain within 4-8 weeks.
Inversion tables vs. traction therapy comparisons reveal similar plateau patterns across decompression modalities. This response reflects physiological limits, not equipment inadequacy.
Common Mistakes That Derail Progress
Aggressive progression sabotages results more than any other factor. Users who jump to 60-degree angles in week two risk muscle strain, dizziness, and loss of confidence. The Inversion Table Results Timeline: What to Expect in Week 1, Month 1, and Month 3 requires patience and systematic advancement.
Inconsistent scheduling creates a “two steps forward, one step back” pattern. Your tissues lose adaptation gains during extended breaks. Three consecutive days without inversion resets progress by approximately one week. Daily sessions—even brief ones—maintain therapeutic momentum better than sporadic longer sessions.
Ignoring contraindications poses serious risks. Users with uncontrolled hypertension, glaucoma, or recent surgeries must consult physicians before starting inversion therapy. Dangers of inversion tables outlines critical safety considerations that protect vulnerable populations.
Poor equipment selection undermines results. Budget models lack the stability and adjustability required for safe progression. Inversion table buying guide helps you select appropriate equipment for your body type and therapeutic goals.
Maximizing Long-Term Benefits Beyond Month 3
Sustained benefits require evolution of your inversion practice. Month four introduces advanced techniques: oscillation (gentle bouncing while inverted), extended holds at partial inversion, and integration with stretching protocols. These variations prevent adaptation stagnation and target different tissue layers.
Inversion tables for scoliosis and spinal alignment demonstrates how long-term users achieve structural improvements beyond simple pain relief. Consistent therapy over 6-12 months can influence postural patterns and reduce curvature progression.
Your maintenance phase should include complementary therapies. Core strengthening exercises, proper ergonomics, and anti-inflammatory nutrition create synergistic effects. Inversion therapy works best as part of a comprehensive spinal health strategy, not as a standalone intervention.
Track your progress objectively. Measure pain levels weekly using a 0-10 scale. Document flexibility improvements through standardized tests like the sit-and-reach assessment. Quantifiable data reveals subtle improvements that subjective feelings might miss during the plateau phase.
Conclusion
The Inversion Table Results Timeline: What to Expect in Week 1, Month 1, and Month 3 follows a predictable pattern: rapid adaptation in week one, significant improvement through month one, and plateau by month three. Success requires realistic expectations, consistent application, and strategic evolution of your practice.
Start conservatively with 60-90 second sessions at shallow angles. Progress systematically to 3-5 minute sessions at 30-45 degrees by month one. When the month three plateau arrives, vary your approach rather than abandoning therapy. Integrate complementary strategies like core strengthening and nutritional optimization.
Your next step: commit to a 90-day trial with documented progress tracking. Select appropriate equipment through our comprehensive buying guide, establish a consistent schedule, and prepare for the plateau phase mentally. The users who succeed view inversion therapy as a long-term investment in spinal health, not a quick fix for temporary discomfort.
SEO Meta Title: Inversion Table Results Timeline: Week 1, Month 1 & Month 3